
Your artworks
Add, describe and manage works: one by one, in bulk, or with AI.
Add your first artwork
From a photo on your computer to a published piece, in about two minutes.
Steps
Go to Artworks and open the Add one tab.
Or click Add artwork on your Overview. The form is laid out as five numbered steps.
Step 1: choose your Image.
JPG, PNG or WebP, with the longest side 1600px or more.
Step 2: enter a Title and pick an Art type.
Add a Genre, Material and Medium if they apply.
You can type your own value in any of the three.
Step 3: enter Width (cm) and Height (cm).
These drive the frame previews and room mockups, so they are worth getting right.
Step 4: set the Sale status and a Price if the work is for sale.
Click Preview in the bar at the bottom to check the public page, then Publish artwork.
Tips
- A step’s number turns into a tick once its required fields are filled, and the bar at the bottom counts how many are done.
- Leave the price blank to show “Price on request” instead of a number.
- Step 5 · Tell its story is optional — add a description, a series name or exhibition history now or later.
Common problems
I have reached my artwork limit
Each plan includes a set number of artworks. Upgrade, or unpublish a piece to free a slot.
My work looks small in the room mockups
The width and height are probably missing or wrong. Check them in centimeters.
Photographing your art for the web
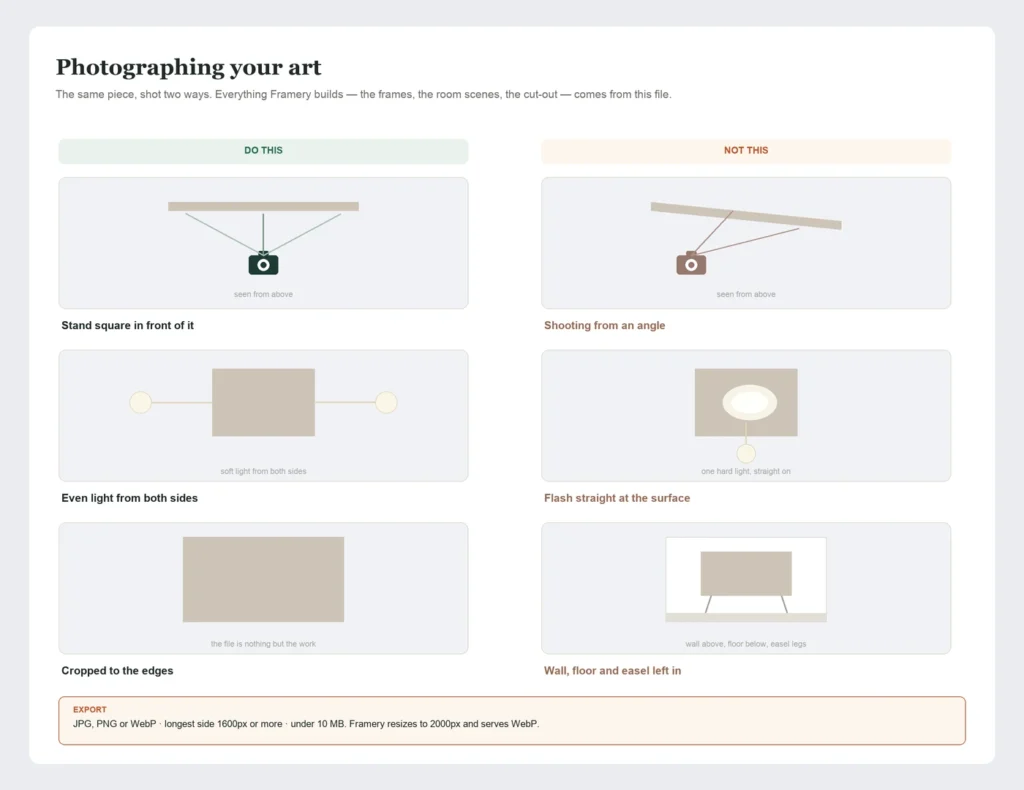
Everything Framery shows — the frames, the room scenes, the cut-out — is built from your photo, so the photo is worth twenty minutes.
Steps
Hang or lean the work flat and stand square in front of it.
Shooting from an angle makes a rectangle look like a trapezium, and no amount of editing fully undoes it.
Light it evenly from both sides.
Daylight from a window on an overcast day is ideal. Avoid a flash pointed straight at the surface.
Fill the frame with the work, then crop to its edges.
Leave no wall, floor or easel in the final image.
Shooting a sculpture or object? Leave a little space around it and plan to cut the background out.
Export as JPG, PNG or WebP with the longest side 1600px or more.
Under 10 MB per file.
Check the result at full size before you upload it.
If the texture is mushy at 100%, the mockups will look soft too.
Tips
- Photograph the work itself, not a framed copy of it — the frames are added on the page.
- Shoot every piece in the same light if you can. A gallery whose photos match reads as one body of work.
- Keep the originals on your own computer. Framery stores the web copy, not your archive.
Common problems
The colors are off
Set a white balance on a sheet of white paper in the same light, or correct it once and apply the same correction to every photo from that session.
There is a glare patch on the surface
Move the lights further to the sides, or shoot glossy work slightly off-axis and correct the shape afterwards.
My file is over 10 MB
Export again as a JPG at quality 80–90. At 2000px that is usually 1–2 MB with no visible loss.
Why dimensions matter
Width and height are what let Framery show your work at a believable size on a wall — and at its real size in someone’s room.
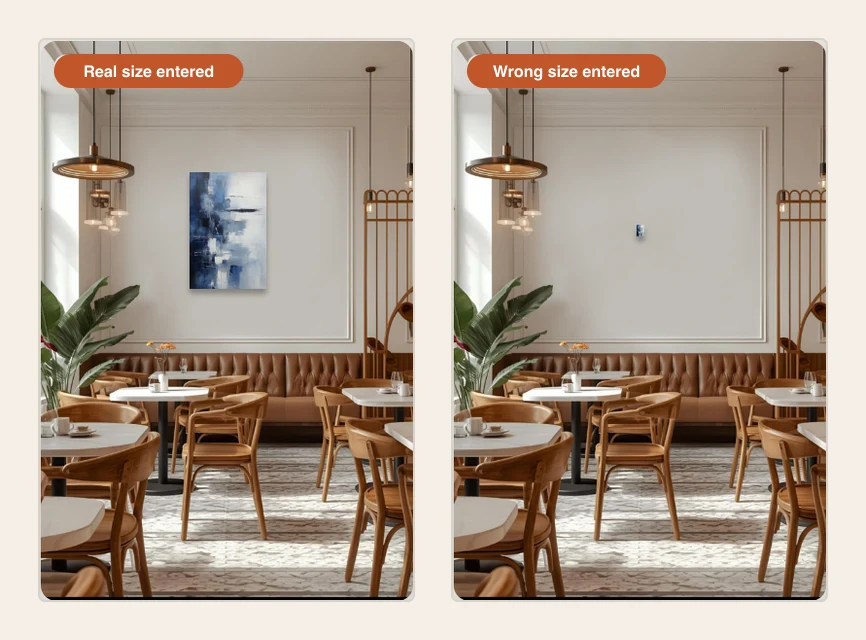
Framery does not guess how big a piece is from the photo. It uses the measurements you enter, in centimeters, for three things: the frame previews, the interior room mockups, and View in your space on a phone.
A missing or mistyped size is the single most common reason a gallery looks wrong, because a painting entered as 5cm instead of 50cm appears as a postage stamp on the wall.
Tips
- Measure the artwork itself, not the frame.
- Round to the nearest centimeter — nobody will notice a millimetre.
- For a sculpture, tick 3D artwork (sculpture / object) and add a Depth (cm) too.
Sculptures and 3D works
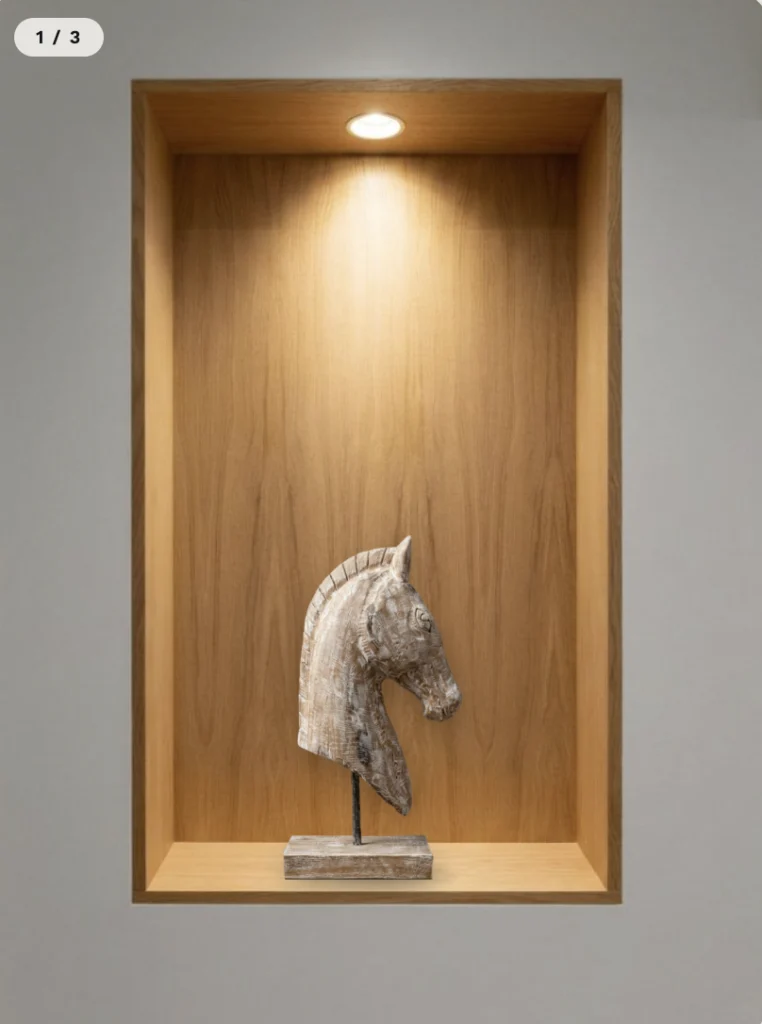
A free-standing piece is handled differently from wall art: it gets a cut-out, a depth, and floor or pedestal scenes instead of frames.
Steps
Add the piece as usual from Artworks → Add one.
In Step 3 · Size and year, tick 3D artwork (sculpture / object).
Fill in Width (cm), Height (cm) and Depth (cm).
Height is what the room scenes scale against, so it matters most.
Use Remove background under the image so the object stands free of its background.
Try Hard edges — objects have a clear outline.
Publish.
The piece now appears on floor and pedestal scenes rather than on walls.
Tips
- Photograph the piece against a plain background so the cut-out has a clean edge to find.
- Shoot from roughly eye level — that is the angle the room scenes are built for.
- A wall-mounted relief is usually better left as flat art: leave 3D artwork unticked so it can be framed.
Common problems
My sculpture appears on a wall
The 3D artwork (sculpture / object) tick is off. Edit the piece, tick it and save.
It looks the wrong size on the floor
Check the height in centimeters. A 40cm figure entered as 4cm will sit on the floor like a coin.
The cut-out clipped a thin part
Re-cut with Soft, or re-shoot against a background with more contrast behind the thin section.
Remove the background
Turn a photo of your work into a clean cut-out in one click. It runs in your browser and works on every plan.
Steps
Go to Artworks and open the Add one tab.
To use an artwork you already have, click Edit on it instead.
In Step 1, upload your artwork image, then click Remove background under it.
Wait a few seconds while the cut-out is made.
The first time takes longer, because your browser downloads the tool once and then remembers it.
In the preview, choose an edge under Edges.
Switching between them is instant.
Click Use this cut-out.
It replaces the image in the form.
Click Publish artwork, or Save changes if you are editing.
Which edge?
Balanced and clean, and the default. The best choice for most works.
A gently feathered edge. Good for loose brushwork and textured pieces.
A sharp cut. Best for objects and sculptures with a clear outline.
Tips
- Shoot against a plain background that contrasts with the work.
- Use even light, without strong shadows around the edges.
- Importing many pieces at once? Tick Remove backgrounds on the Bulk import tab to process them all together.
Common problems
It is taking a long time
The first cut-out downloads the tool to your browser, which can take a minute on a slow connection. After that it is much faster.
Part of my artwork was cut off
Try Soft. If it still happens, re-shoot against a background with more contrast.
A thin line of the old background is left
Switch to Hard, which trims the edge more tightly.
Price, sale and frame status
How to say what a piece costs, whether it is available, and whether it comes framed.
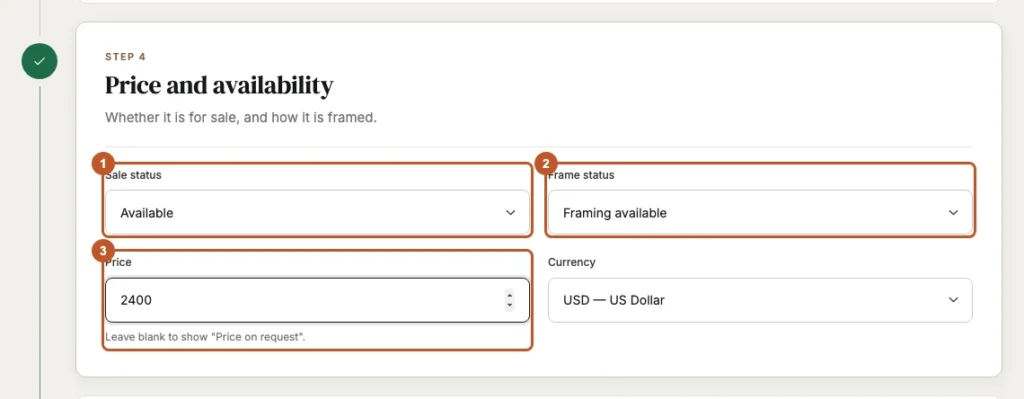
Sale status
Shows the price and an enquiry button.
Shows a Sold tag, and hides the enquiry button.
Shows “Not For Sale” instead of a price.
Tips
- Leave Price blank and the page shows “Price on request”.
- Frame status is separate from the frame previews: it tells a buyer what they actually receive.
- Use Custom enquiry URL in Step 5 · Tell its story to send buyers to your own form for one particular piece.
Tell the story
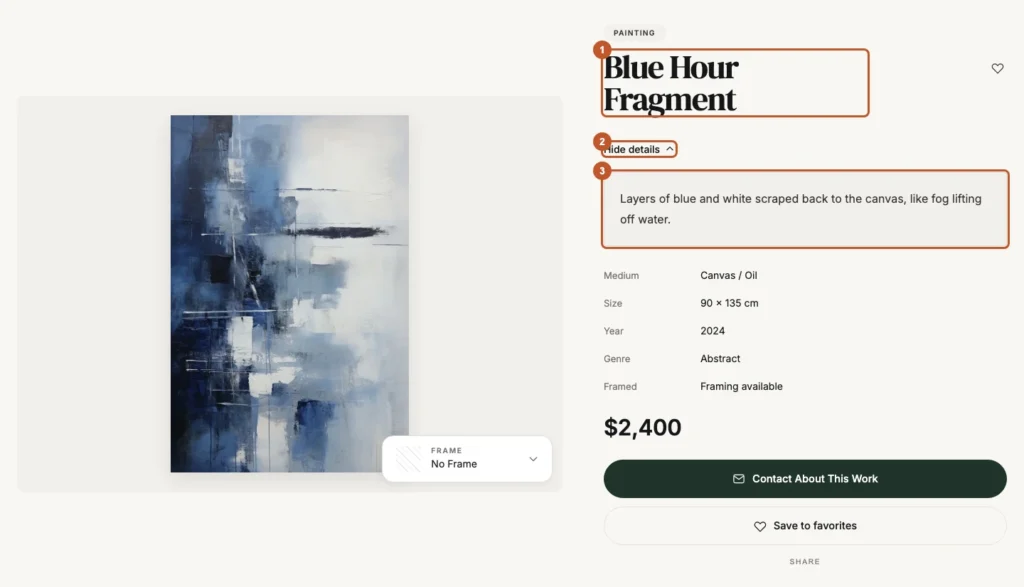
The optional last step of the artwork form, Tell its story, is what turns a picture on a page into a piece someone wants to live with.
Steps
Open Artworks and click Edit on a piece.
Scroll to Step 5 · Tell its story.
Write the Description / story.
Two or three sentences about what the work is and where it came from is plenty.
Add a Poetic quote if one fits.
A single short line, shown on the detail page.
Name the Series the piece belongs to.
Works sharing a series name are grouped together, e.g. “Winter Studies”.
List the Exhibition history, one show per line, and any Frame notes.
Click Save changes.
What goes where
The prose paragraph. Materials, intent, the day you made it.
One line, set apart from the description. Keep it short and personal.
Where it has been shown. Shown with the story behind “Learn more”.
Tips
- Write for a visitor who has never met you and cannot see the piece in person.
- Frame notes is the place for details like “white oak, museum glass”.
- Custom enquiry URL overrides the default contact button for this one piece — useful when a work is with a gallery.
- The story and exhibition history sit behind Learn more on the public page, so length is not a problem.
Extra views and details
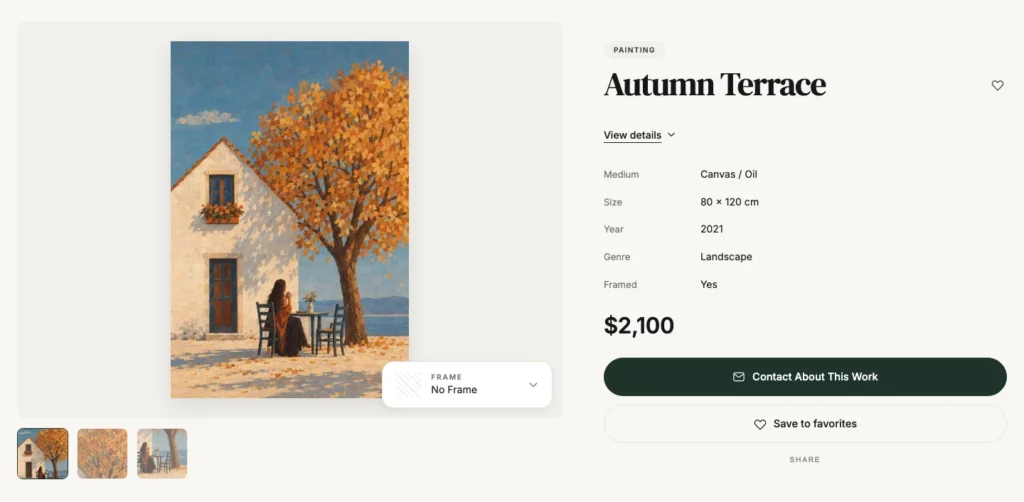
Additional shots — a raking-light detail, the back, the signature — shown as thumbnails under the main image.
Steps
Edit the piece and find Additional views in Step 1, under the main image.
Upload one image per slot.
Different angles, or zoomed-in details of the surface.
Click Save changes.
They appear as a thumbnail rail labelled “Other views of this artwork”.
Tips
- Two or three extra views is usually enough. A long rail invites scrolling instead of looking.
- A close-up of the surface does more for a painting than another full view of it.
- For a sculpture, add the other sides — this is the only place a visitor can walk around it.
Live preview
See the public artwork page while you are still filling the form, without publishing anything.
Steps
Fill in at least a title and an image on the artwork form.
Click Preview in the bar at the bottom of the form.
The Artwork page preview panel opens beside the form.
Keep editing.
The preview follows what you type — price, sale status, dimensions and all.
Click Close preview when you are done, then publish or save.
Tips
- The preview is a simplified view of the real page — it shows your content and layout, not the interior scenes or the AR button.
- It is the quickest way to catch a dimension typo: a wrong size looks wrong immediately.
- Nothing in the preview is public. Only Publish artwork makes the piece visible.
Manage your gallery list
Publish, unpublish, edit and delete — one piece at a time or a whole selection at once.
Steps
Open Artworks.
The My artworks tab holds everything you have added.
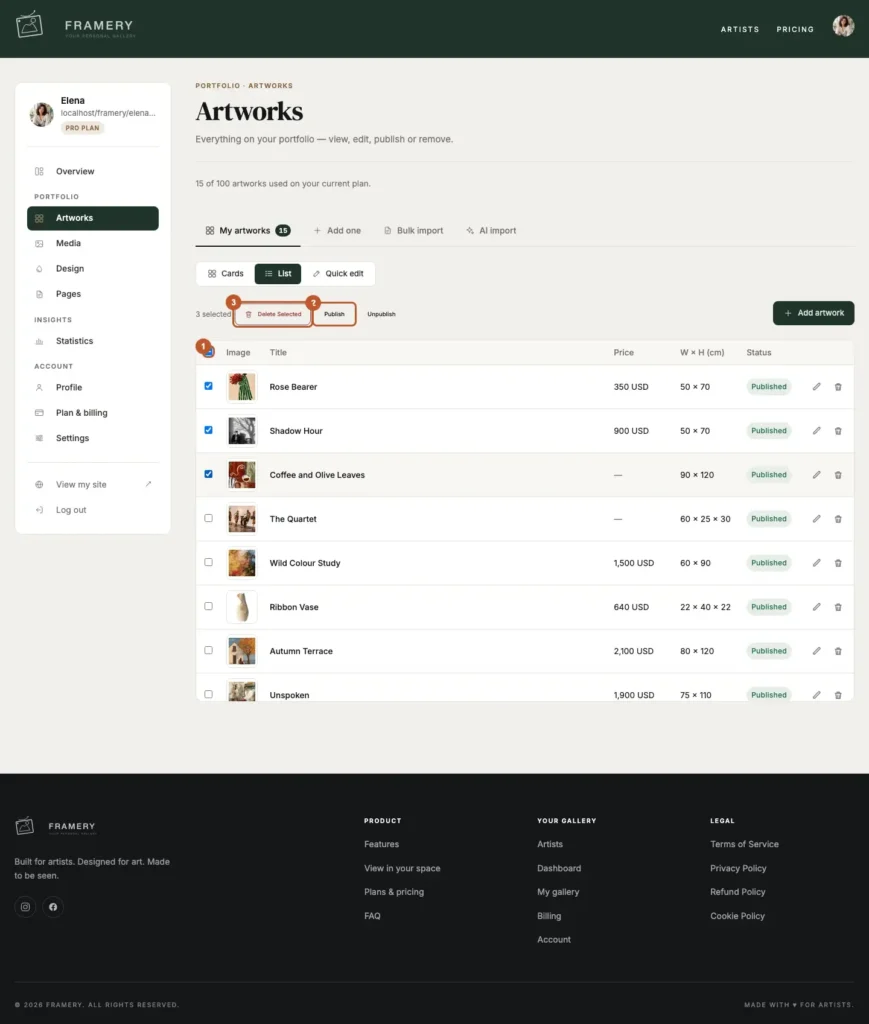
Pick a view: Cards, List or Quick edit.
List is the one with tick boxes and bulk actions.
In List, click Edit on a row to change a piece, or Delete to remove it.
Each row shows its image, title, W × H (cm), price and status.
To act on several at once, tick them — or use Select all.
Choose Publish, Unpublish or Delete Selected.
The count of selected works is shown beside the buttons.
Confirm when asked.
Deleting cannot be undone.
Published or draft
Live on your gallery, counted against your plan’s artwork limit.
Hidden from visitors, kept in your list, and does not use a published slot.
Gone for good, along with its story and extra views.
Tips
- Out of slots? Unpublish your weakest piece instead of deleting it — you keep the work and free the slot.
- Unpublishing is also the polite way to retire a sold piece you do not want enquiries about.
- Cards is the view with Search artworks and Sort, plus filters for published, drafts and sale status.
- Quick edit is your whole gallery as a spreadsheet: click a cell to change it, tick several rows to copy one edit across all of them, then Save changes.
- Quick edit’s Needs attention filter collects every piece with a missing size, type, price or year. It is the fastest way to find the gaps.
Common problems
Delete is greyed out or nothing happens
The confirmation dialog was dismissed. Click Delete again and confirm.
I deleted the wrong piece
Deletion is permanent — the artwork has to be added again from your own copy of the photo.
I have reached my artwork limit
Unpublish something, or upgrade your plan to raise the limit.
My Quick edit changes disappeared
Quick edit stages your edits. The bar reads Unsaved until you click Save changes, and Discard throws them away.
Bulk import
Pick a folder of images and fill in all their details together in one editable table.
Steps
Go to Artworks and open the Bulk import tab.
Step 1: choose your image files — one image per artwork.
JPG, PNG or WebP. A row appears below for each one.
Optionally tick Remove backgrounds and pick an edge.
Every image is cut out in your browser before upload, which takes a minute for a large batch.
Step 2: fill in the table.
Click any cell to change it. Enter moves down a row, Tab moves across.
Only title is required. Leave anything else blank and finish it later in Quick edit.
To set the same value on several pieces at once, tick their rows: an edit in one ticked row is copied to all of them.
The chips above the table — Missing size, Missing price and so on — show what still needs filling in.
Click Import artworks.
Open Show per-row results to check each row.
Tips
- Already keep your work in a spreadsheet? Open Already have a spreadsheet? in Step 1, download the template, and your CSV fills the table in for you. The file is read in your browser and never uploaded.
- In the CSV, image_filename is how each row finds its picture — type the exact filename of that row’s image.
- Imported pieces arrive published, so import in batches you are happy to show.
- A row with no width and height imports fine, but the piece will not sit right in the room mockups until you add them.
Common problems
Some rows were skipped
Open Show per-row results — each skipped row says why.
My spreadsheet did not fill everything in
The hint under the CSV field says how many rows matched. A row only matches when its image_filename is one of the images you chose.
The upload was rejected before it started
The batch was over 100 MB or over 20 images. Split it, or export the photos a little smaller.
I hit my plan limit part way through
Everything up to the limit was imported. Upgrade, or unpublish something, then import the rest.
AI Import
Upload the images and let Framery suggest the title, type, materials and dimensions for each one — then edit anything before it saves.
Steps
Go to Artworks and open the AI Import tab.
Step 1: choose your image files.
JPG, PNG or WebP, up to 20 per batch.
Step 2: click Analyze with AI.
Each image is studied one at a time, so a full batch takes a few minutes.
Step 3: work through the table.
It is the same table as Bulk import — every field stays editable, so fix anything the suggestion got wrong.
Click Save all.
Tips
- Suggestions are a starting point, not a decision — read every row before you save.
- The AI does not write your description. That is yours to write, on the artwork’s own edit page.
- Run a batch of two or three first to see the shape of the suggestions before committing twenty.
Common problems
The AI Import tab is locked
It is available on the Pro plan and above. On Free and Starter the tab carries a Pro tag and shows Unlock AI Import.
One image failed to analyze
Its row says so and the rest continue. Click Retry on that row, or fill it in by hand.
Too many image files
Up to 20 per batch. Split the rest into a second run.
The suggestions are generic
A tighter crop and better light give the analysis more to work from.