
Getting started
Your account, email check, and a tour of the dashboard.
What is Framery
Framery gives you a gallery website of your own at framery.space/yourname, where visitors can see your work framed and hanging in a real room.
Your gallery is a real website, not a profile on someone else’s platform. It has your name in the address, your colors and fonts, and only your work on it.
Visitors can browse your pieces, see any of them framed on a wall in a furnished room, and — on a phone — hold the camera up to their own wall and see the work at its real size.
The Free plan does not expire and is not a trial. You can keep a gallery on it for as long as you like.
Tips
- Your gallery is public as soon as you verify your email address.
- You can change your colors, fonts and pages at any time without losing your artworks.
Create your account
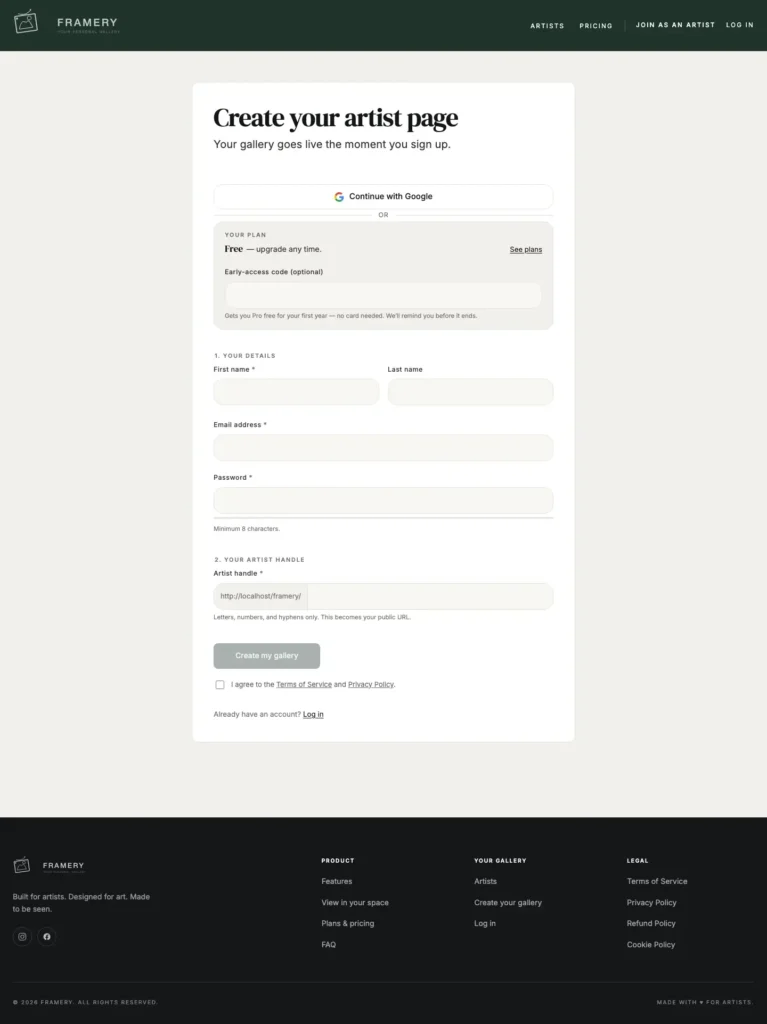
Sign up with an email address or with Google, and choose the handle that becomes your gallery address. There is no plan to pick first — new galleries start on Free.
Steps
Go to Join as an artist from the top of any page.
Or use Continue with Google, which fills in your details and skips both the password and the email check.
Fill in 1. Your details: first name, last name, email and password.
Eight characters minimum on the password.
Choose your handle under 2. Your artist handle.
This becomes your address, framery.space/yourhandle. A tick appears when it is free.
Got an Early-access code? Put it in the optional field.
It gets you Pro free for your first year, with no card.
Click Create my gallery.
If you arrived from a paid plan on the pricing page, checkout opens next. Otherwise you land straight on your dashboard.
Open the verification email and click the link.
Signed up with Google? Skip this — Google has already confirmed your address.
Common problems
The handle I want is taken
Handles are first come, first served. Try adding your discipline or your city — many artists use something like janedoe-ceramics.
I never got the verification email
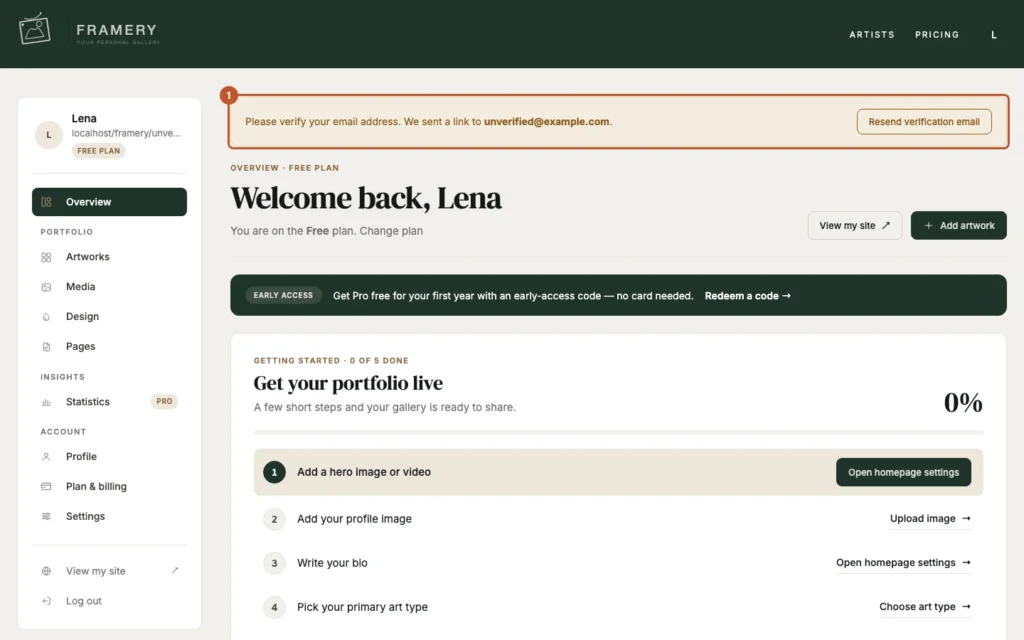
Check your spam folder first. You can send a new link from the banner at the top of your dashboard.
Which plan do I start on?
Free, unless you arrived from a paid plan on the pricing page or entered an early-access code. The Your plan line above the form says which, and you can change it later under Plan & billing.
I closed the checkout window without paying
Your gallery was already created, on Free. Your dashboard keeps the plan you picked on a banner — use Finish upgrading when you are ready, or Not now to forget it.
Bot check failed
The sign-up form runs a Cloudflare check. Reload the page and submit again.
Verify your email
Your gallery stays private until you confirm your email address. It takes one click.
Steps
Open the email from Framery and click the link in it.
It is good for 24 hours and works once.
If it has expired, use Resend verification email on the banner at the top of your dashboard.
Reload your gallery address to confirm it is live.
Common problems
The link says it has expired
Verification links last 24 hours. Request a new one with Resend verification email on the dashboard banner, and use it straight away.
Visitors land on framery.space instead of my gallery
That is the unverified state — the public is redirected away until you confirm your address. Clicking the link stops it immediately.
My gallery looks fine to me, so why is it not public?
You are signed in, and the owner always gets a preview. The bar reading “Your portfolio is not public yet” across your own site is the tell.
I signed up with Google and no email arrived
Google confirmed your address for us, so there is nothing to verify. Your gallery is already public.
Tour of your dashboard
What each item in the sidebar is for, in one line each. It is grouped into Portfolio, Insights and Account.
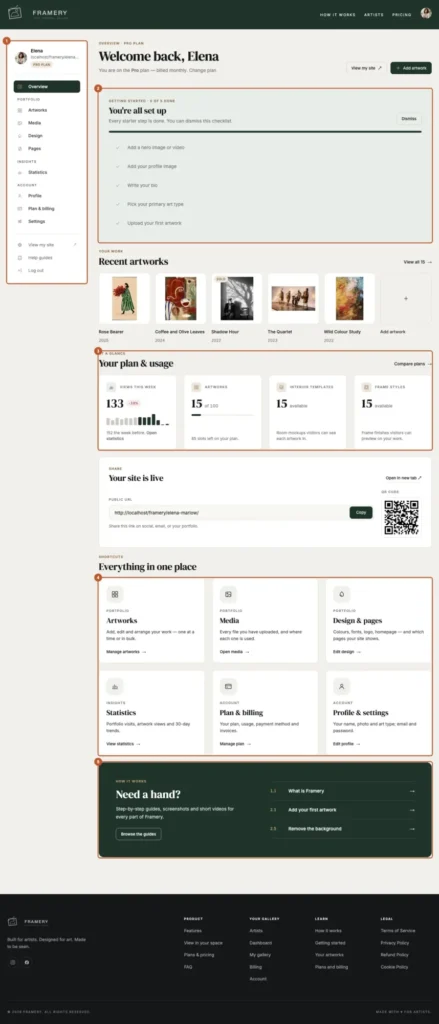
The sidebar
Your setup checklist, plan usage, your gallery link and QR code, and shortcuts to everything else.
Add, edit and remove works — one at a time, in bulk, or with AI Import.
Every file you have uploaded, grouped by where it is used.
Your colors and typefaces — the look of every page.
Which pages your site shows, your header and footer, and what each page says.
Visits and artwork views.
Your name, photo and primary art type.
Your plan, how much of it you are using, payment method and invoices.
Change your email address or password.
At the foot of the sidebar.
The onboarding checklist
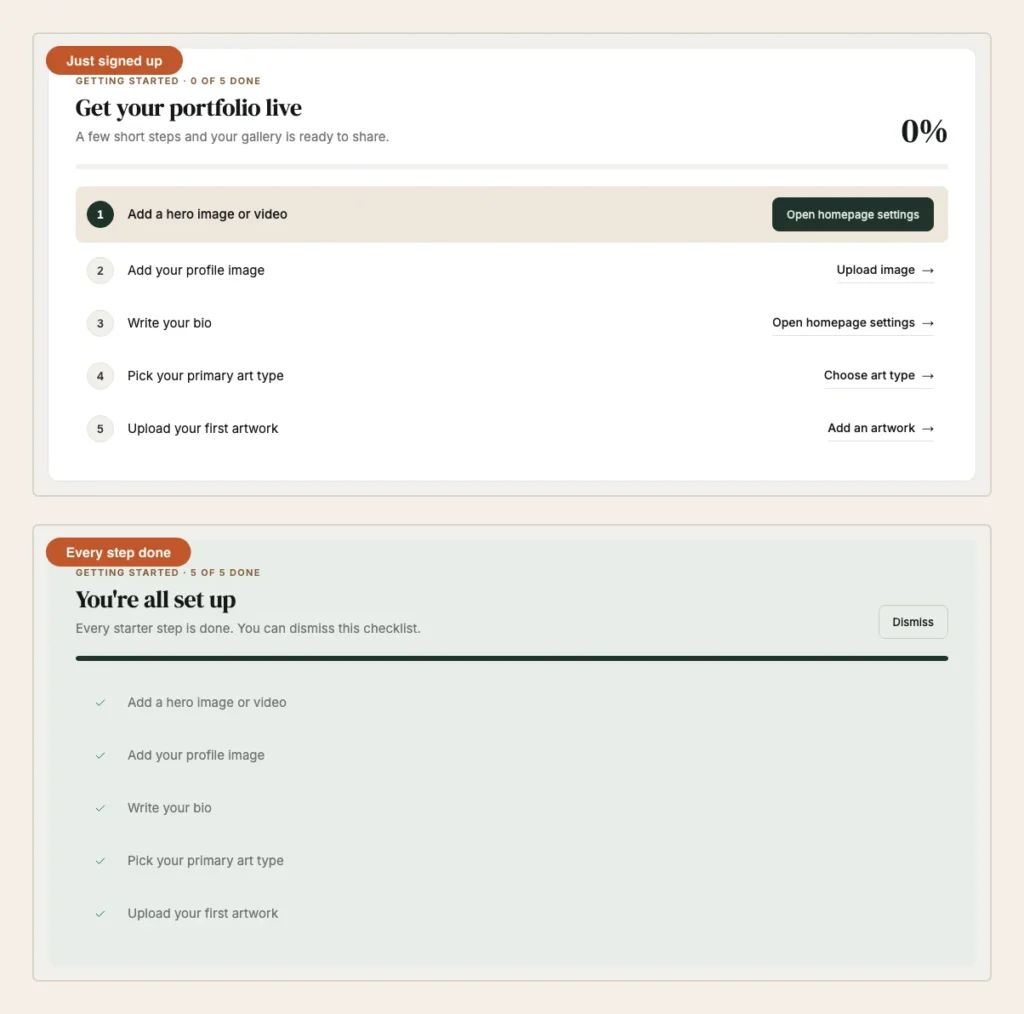
Five steps on your Overview that take a brand new gallery to one worth sharing.
Steps
Add a hero image or video — the first thing a visitor sees.
Pages → Home Page.
Add your profile image — the photo shown in your artist section.
Profile.
Write your bio — a short paragraph about your work.
Pages → Home Page, not Profile.
Pick your primary art type — what you mainly create.
Profile. It also places you in the artists directory.
Upload your first artwork.
Artworks → Add one.
Tips
- The next step to do is highlighted, with its own button.
- Once all five are done, click Dismiss to hide the checklist.
- A hero video takes priority over a hero image if you set both.